

TL;DR:
- The custom component prototyping process is an iterative cycle that transforms a design concept into a validated, manufacturable part through rapid building, testing, and refinement. Mastering this cycle helps teams reduce costly redesigns and aligns stakeholders early, resulting in better parts shipped faster. Using targeted prototype fidelity, defined API contracts, and modern tools like AI-assisted software accelerates development, while disciplined execution ensures smooth transition from prototype to production.
The custom component prototyping process is the iterative cycle that transforms a design concept into a validated, manufacturable part by rapidly building, testing, and refining prototypes before committing to full production. Engineers and product designers who master this cycle cut costly late-stage redesigns and align stakeholders far earlier in development. The process is not a single event. It is a structured loop that bridges CAD models and shop-floor reality, and the teams that treat it that way consistently ship better parts faster.
What are the essential phases of the custom component prototyping process?
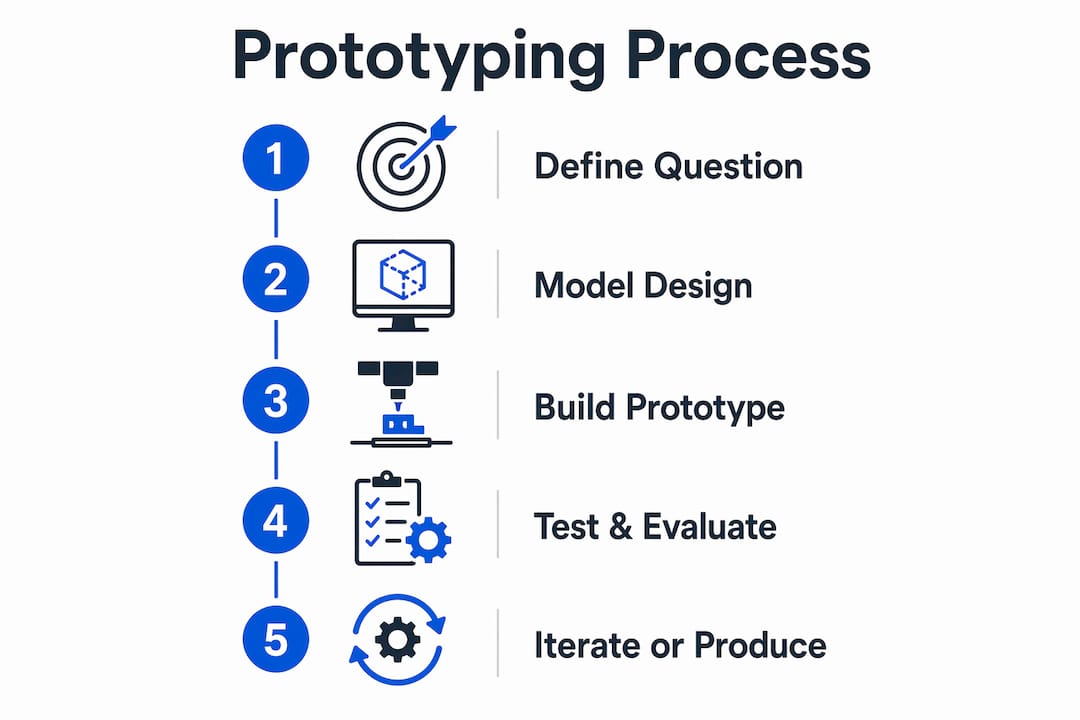
The prototyping process follows three core phases: define the riskiest question, build the minimum testable version, and run user or engineering testing before iterating again. This structure reduces risk and aligns stakeholders before full-scale manufacturing begins. Linear development skips this loop, which is why it produces expensive surprises at tooling time.
Here is how each phase works in practice:
-
Define the core question. Identify the single riskiest assumption in your design. Is it dimensional fit, material behavior under load, or assembly sequence? Naming it precisely keeps the prototype focused and prevents scope creep before a single chip is cut.
-
Build the minimum testable version. Produce only what is needed to answer that question. A rough 3D-printed shell tests form and fit. A machined aluminum blank tests tolerances. Resist adding features that do not serve the test.
-
Run structured testing. Put the prototype in front of engineers, assemblers, or end users. Collect feedback on friction points, not just preferences. Unmoderated testing yields more realistic feedback on friction points than moderated lab sessions because participants behave naturally without guidance.
-
Iterate with purpose. Use feedback to refine the next build. Early rounds answer directional questions. Later rounds answer refinement questions. The shift in feedback quality tells you where you are in the cycle.
-
Decide to advance or pivot. When feedback stops asking “why does this work this way?” and starts asking “how can we make this better?”, the prototype is maturing toward production readiness.
Pro Tip: Set a hard time limit on each build window. A 48-hour constraint forces your team to test the riskiest assumption first instead of polishing details that have not been validated yet.
Which modern tools accelerate the component development workflow?

The right tools cut the time between design intent and physical or functional feedback. Modern rapid prototyping services and software have compressed what once took weeks into hours.
AI-assisted prototyping platforms now generate real component code from design inputs. Tools like Workshop AI produce deployable prototypes from actual component libraries, not generic placeholders. AI tools generate UIs with real components deployable to live URLs for stakeholder review, which eliminates the traditional handoff gap between designer and developer.
Importing real component libraries into your prototyping pipeline matters more than most teams realize. Using tools like Code Connect or custom MCP servers integrates your actual component metadata into AI workflows, improving prototype accuracy relative to production constraints. Generic AI generation produces plausible-looking output that diverges from your real codebase. Importing your source libraries closes that gap.
Physical prototyping technologies each serve a different phase of the component development workflow:
| Technology | Best Phase | Strength | Limitation |
|---|---|---|---|
| FDM 3D Printing | Early form/fit testing | Fast, low cost | Limited material fidelity |
| SLA/SLS Printing | Functional geometry testing | High detail, better surface | Slower, higher cost |
| CNC Machining | Near-production validation | True material, tight tolerances | Longer lead time, higher cost |
| Wire EDM | Complex geometry validation | Extreme precision on hard metals | Specialized, not for early rounds |
CNC machining sits at the critical transition point between prototype and production. It produces parts in the actual material with production-level tolerances, which means the feedback you get is directly applicable to your manufacturing process.
Pro Tip: Use 3D printing for the first two prototype rounds to answer form and fit questions cheaply. Reserve CNC machining for the round where material behavior and dimensional accuracy are the actual variables under test.
How to execute a step-by-step custom part creation process
Execution is where most teams lose discipline. The prototype design process succeeds when you treat each build as a focused experiment with a defined hypothesis, not a miniature version of the full product.
Start with a single problem statement
Write one sentence describing what the prototype must prove or disprove. “This bracket must maintain a 0.002-inch tolerance under 50-pound lateral load” is a testable statement. “Let’s see how it feels” is not. Every design decision in the build should trace back to that statement.
Use the right modeling tools for the phase
Sketches and CAD tools like SolidWorks or Autodesk Fusion 360 handle geometry. For component-level software prototypes, Figma handles UI contracts. For physical components, your CAD model feeds directly into CNC toolpaths. Match the tool to the fidelity the phase requires.
Define and protect your API contract early
This principle applies to both software components and physical part interfaces. Before coding prototyping components, define stable public API contracts including attributes, events, and styling hooks, then create tests that verify these contracts independent of internal changes. In physical manufacturing, the equivalent is locking your interface dimensions, mounting patterns, and material specs before iterating on internal geometry. Changing interface specs mid-cycle breaks downstream assemblies.
Apply intentional build constraints
Prototyping works best as a series of short, focused build windows with intentional constraints to test the riskiest assumptions. Limit data modeling and infrastructure choices early to maintain momentum. In machining terms, this means avoiding full surface finishing or secondary operations on a prototype that has not yet passed fit testing.
Test against the contract, not the snapshot
For software components, automated tests using Vitest or Playwright protect contract stability by verifying attributes, events, and behavior rather than locking in specific HTML output. For machined components, your test plan should verify the interface dimensions and functional requirements, not every cosmetic feature. Testing the right things prevents false passes and false failures.
Pro Tip: Document your API contract or interface spec in a single shared file before the first build starts. When a team member proposes a change mid-cycle, the document makes the cost of that change visible immediately.
What common pitfalls derail the prototyping techniques for components?
Most prototype failures trace back to a small set of repeatable mistakes. Recognizing them early saves weeks of rework.
-
Building high-fidelity prototypes too early. High-fidelity prototypes built prematurely cause sunk cost bias and excessive documentation. Teams become attached to unvalidated design features simply because they look finished. Match fidelity to the question being asked, not to the audience you want to impress.
-
Vague or shifting interface specs. A custom component fails when the developer or engineering contract is vague. Stable API contracts and clear attribute definitions prevent fragile code and fragile assemblies. Lock the interface before iterating on internals.
-
Misreading feedback signals. Collecting feedback is not the same as interpreting it correctly. A stakeholder saying “I love it” tells you nothing about whether the part will survive assembly. Ask specific questions tied to your prototype’s hypothesis.
-
Skipping unmoderated testing. Moderated reviews produce polite responses. Unmoderated testing reveals where real users actually struggle. The same principle applies in manufacturing: watch an assembler work with your prototype without coaching them.
-
Overbuilding before validating. Adding secondary features before the primary function is confirmed wastes machining time and creates noise in your feedback data.
“The goal of a prototype is to answer a question as cheaply and quickly as possible. The moment it becomes about showing off the design, you have lost the thread.”
Pro Tip: When you cannot decide whether to pivot or iterate, ask: has the core question been answered? If yes, iterate. If the answer revealed a flawed assumption, pivot. If the question was never clearly tested, rebuild the prototype with a sharper hypothesis.
Knowing when to move from prototype to production is a skill in itself. The signal is clear: feedback shifts from “why?” to “how can we refine?” and the core value holds up without manual guidance from the team presenting it.
For teams working on OEM part prototyping, the discipline of iterative refinement is especially critical because interface specs must survive integration with systems you do not control.
Key takeaways
The custom component prototyping process succeeds when each build round tests one specific assumption, uses fidelity matched to that question, and advances only after feedback confirms the core function holds.
| Point | Details |
|---|---|
| Define one question per round | Each prototype build must test a single riskiest assumption to stay focused and generate usable feedback. |
| Match fidelity to the phase | Use 3D printing for early form testing and CNC machining only when material accuracy is the variable under test. |
| Lock interface specs early | Stable API contracts or interface dimensions must be defined and protected before iterating on internal geometry. |
| Test the contract, not the snapshot | Verify functional requirements and interface behavior rather than cosmetic or structural details that have not been validated. |
| Read feedback quality to gauge readiness | When questions shift from “why?” to “how do we refine?”, the prototype is ready to advance toward production. |
Where most teams get prototyping wrong
I have watched experienced engineering teams burn three weeks on a prototype that answered the wrong question. The part looked production-ready. The surface finish was excellent. The tolerances were tight. And none of it mattered because the team had never confirmed whether the mounting interface matched the customer’s assembly fixture.
The discipline that separates fast-moving teams from stuck ones is not access to better tools. It is the habit of writing down the question before touching the CAD model. AI-assisted prototyping tools like Workshop AI are genuinely useful, but they amplify your process. If your process starts with a vague brief, the AI generates a polished version of the wrong thing faster.
The integration of AI tools into the component development workflow is real and worth adopting. But human oversight of the interface spec is non-negotiable. No AI tool knows that your customer’s assembly line runs a specific fixture pattern that your CAD library does not include.
Stakeholder pressure to skip prototype rounds is the other consistent failure mode I see. A program manager wants to show progress. A customer wants a delivery date. The answer is not to compress the prototype cycle. The answer is to make each round faster by keeping it smaller. Short, focused build windows with hard constraints produce more learning per dollar than long, open-ended prototype phases.
Treat prototyping as ongoing learning, not a gate you pass through once. The teams that ship the best parts are the ones that prototype again after production feedback, not just before it.
— Andrew
Precision prototyping from concept to production
Machiningtechllc has supported manufacturers through every stage of the custom part creation process since 1985, from first-article prototypes to full-volume production runs exceeding 20 million parts annually. The 70,000 square foot Webster, Massachusetts facility runs Hydromat systems, CNC milling, turning, and wire EDM, giving your prototype the same equipment it will see in production.
Whether you need a single prototype machined to tight tolerances or a validated design scaled into precision parts manufacturing, Machiningtechllc delivers the accuracy and turnaround that product development timelines demand. The team works with aerospace, defense, firearm, and industrial machinery clients who cannot afford prototype failures to carry into production. Contact Machiningtechllc to discuss your component requirements and get a rapid turnaround quote.
FAQ
What is the custom component prototyping process?
The custom component prototyping process is an iterative cycle of defining a testable question, building the minimum viable version of a part, testing it against real requirements, and refining based on feedback before advancing to production.
How many prototype rounds does a typical component require?
Most components require two to four prototype rounds, with early rounds testing form and fit using 3D printing and later rounds validating material behavior and tolerances using CNC machining.
When should you move from prototype to production?
Move to production when feedback shifts from questioning core function to refining details, and the part performs its primary function without team guidance during testing.
What is an API contract in component prototyping?
An API contract defines the stable interface specifications of a component, including its attributes, connection points, and behavioral requirements. Protecting this contract with automated tests prevents fragile assemblies and enables reliable scaling into production libraries.
How does CNC machining fit into the prototype design process?
CNC machining is the right tool for late-stage prototype rounds where material properties, surface finish, and dimensional tolerances are the variables under test. Earlier rounds use faster, lower-cost methods like FDM printing to answer form and fit questions before committing machining time.