

TL;DR:
- Firearm manufacturing follows a strict sequence from raw material to final assembly, with early regulatory gates affecting licensing and serialization. Understanding each machining, heat treatment, and coating step is critical for compliance, process efficiency, and traceability in high-volume production. Proper planning of operations, material choices, and quality controls ensures parts meet safety standards and regulatory requirements.
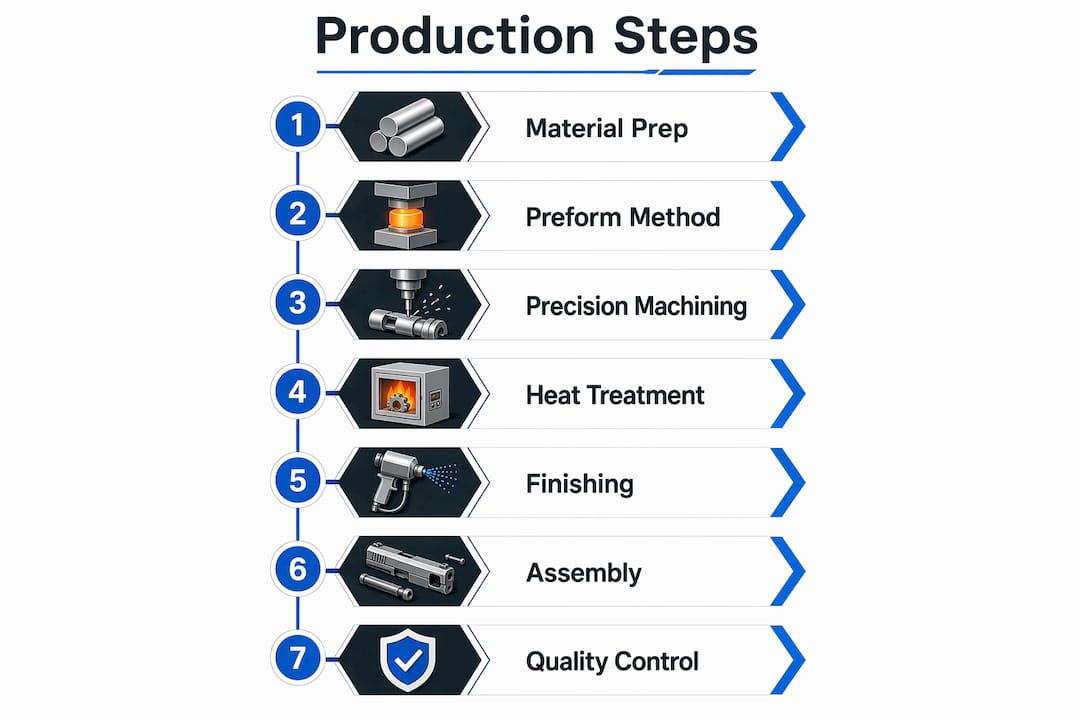
Producing firearm components at an industrial level follows a fixed sequence: raw material receipt and preforming → precision machining (roughing, semi-finish, finish) → heat treatment → surface finishing and coatings → assembly → dimensional inspection, NDT, and proof testing. Before any metal is cut, one regulatory gate must be evaluated: the Bureau of Alcohol, Tobacco, Firearms and Explosives (ATF) classifies partially complete frames and receivers as regulated firearms once they reach a stage where they can be “readily” completed. That determination affects licensing, serialization, and recordkeeping obligations for every shop in the production chain. Machining Technologies LLC and the National Institute of Justice (NIJ) both treat this compliance gate as an engineering design input, not an afterthought.
Core production stages at a glance:
- Raw material receipt, inspection, and preform selection (forging, casting, billet, stamping, polymer molding)
- Rough machining: stock removal to near-net shape
- Semi-finish and finish machining: CNC milling, turning, EDM, broaching
- Heat treatment: quench and temper, case hardening, stress relief, aging
- Surface finishing and coatings: deburring, bluing, parkerizing, nitride, Cerakote
- Subassembly and final assembly with functional checks
- Dimensional inspection, NDT, and proof testing with full documentation
Pro Tip: The moment a machining operation creates a feature that “houses or provides a structure for” a primary fire control component, the ATF considers that item a regulated frame or receiver. Build an engineering gate at that exact operation, not at the end of the process, or you risk producing unregistered firearms.
Table of Contents
- What does the step-by-step firearm component production process look like?
- How do you choose the right raw material and preform method?
- What machining operations does precision firearm production require?
- What heat treatments do firearm components need?
- Which finishing and coating options work best for firearm parts?
- How are barrels manufactured and rifled?
- How are polymer and non-metal components produced?
- What does the assembly and functional testing sequence look like?
- How do you run quality control and proof testing for firearm components?
- What ATF regulations apply to firearm component manufacturing?
- How do you plan production costs and cycle times for firearm components?
- What safety and environmental controls apply to firearm production shops?
- How does Machining Technologies LLC sequence firearm component production?
- Key Takeaways
- What the production floor actually teaches you
- Machining Technologies LLC: contract firearm component production from prototype to volume
- Useful sources
What does the step-by-step firearm component production process look like?
The factory sequence is not a straight line. Several component families (barrels, receivers, small internal parts) move through parallel tracks before converging at assembly. Understanding where those tracks split and where they must synchronize is the first thing a production planner needs to map.
Ordered production flow
- Raw material receipt and incoming inspection — verify chemistry certs, hardness, and dimensional conformance before any work begins.
- Preforming — forgings, castings, or billet blanks are cut to rough size; polymer preforms are molded.
- Rough machining — bulk material removal to within 0.020"–0.060" of finish dimensions; fixtures are set here.
- In-process dimensional check — gauges, CMMs, and hand fixtures validate critical features before heat treat.
- Heat treatment — quench and temper, case harden, or age per part specification; stress relief cycles as needed.
- Finish machining — final geometry, bores, pockets, and mating surfaces to print tolerances.
- EDM and specialty operations — wire EDM for fine pockets; broaching for splines; honing for bores.
- Surface finishing and coatings — deburring, media blast, then bluing, parkerizing, nitride, or Cerakote.
- Assembly — subassemblies built to torque specs; headspace set; serial numbers verified.
- QC, NDT, and proof testing — dimensional audit, magnaflux or dye penetrant on critical parts, live-fire proof test.
- Documentation and shipment — test records linked to serial numbers; packaging per carrier and regulatory requirements.
| Step | Purpose | Typical equipment | Critical inspection point |
|---|---|---|---|
| Raw material receipt | Verify chemistry and hardness | Spectrometer, hardness tester | Material cert review |
| Preforming | Establish near-net shape | Forge press, die-cast machine, band saw | Dimensional check vs. preform drawing |
| Rough machining | Bulk stock removal | CNC mill/lathe, Hydromat | First-article dimensional check |
| Heat treatment | Achieve target hardness and grain structure | Batch furnace, salt bath, induction coil | Rockwell hardness, distortion check |
| Finish machining | Final geometry and tolerances | Multi-axis CNC mill, CNC lathe | CMM, bore gauge, optical comparator |
| EDM / specialty ops | Fine pockets, splines, tight profiles | Wire EDM, broach press, honing machine | Feature-level gauge check |
| Finishing / coatings | Corrosion resistance, wear surface | Tumbler, blast cabinet, coating line | Adhesion, thickness, salt spray |
| Assembly | Fit, headspace, timing | Torque wrenches, headspace gauges | Functional check, torque log |
| QC / proof test | Verify safety and function | CMM, proof chamber | Proof record linked to serial number |
Receivers and barrels typically run in parallel through steps 1–7, then converge at assembly. Small internal parts (pins, springs, sears) often batch through heat treat and finishing separately, arriving at assembly kitted and pre-inspected. Machining Technologies’ precision machining workflow follows this parallel-track model to keep throughput high without sacrificing traceability.
Prototype lead times for a new receiver design typically require multiple weeks from drawing release to first article. Full production, once tooling and fixtures are qualified, can compress per-part cycle times dramatically, especially on Hydromat or rotary transfer systems for high-volume small parts.
How do you choose the right raw material and preform method?
Starting form is one of the most consequential decisions in the entire firearm parts manufacturing process. It drives grain structure, material waste, secondary operations, and ultimately cost per part.
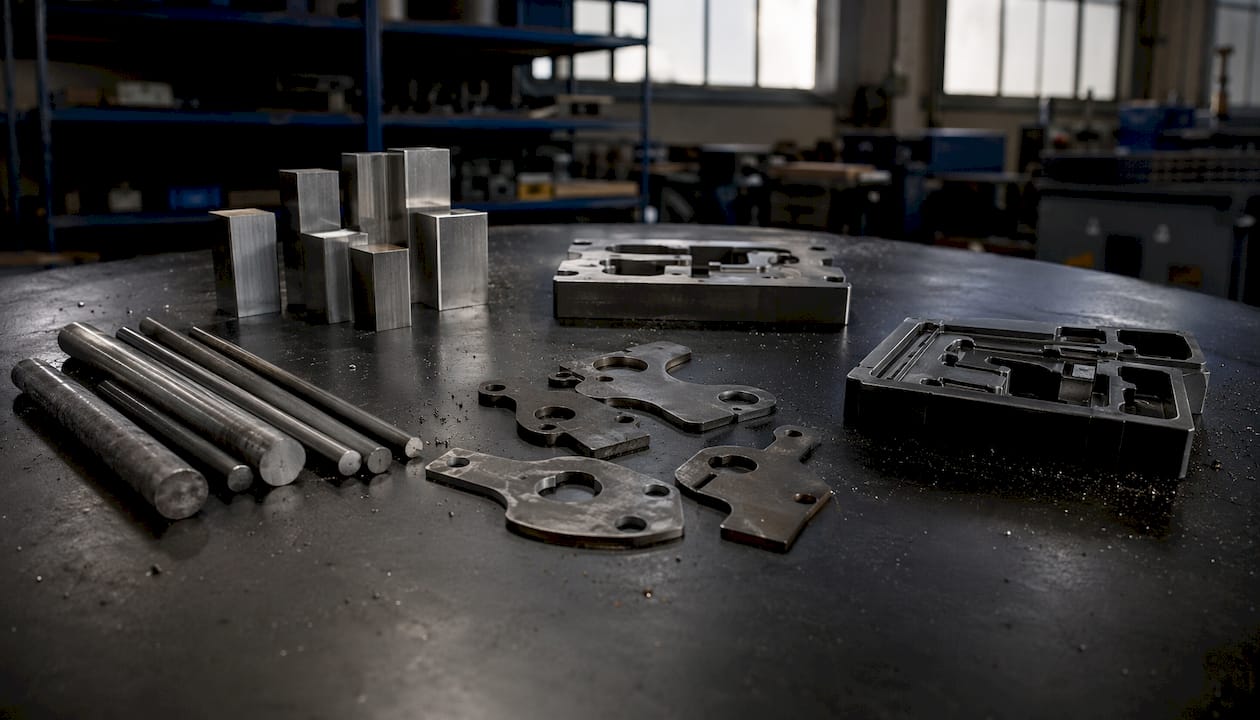
Common preform methods and when to use them
Forgings produce the strongest grain flow for high-stress components like bolts, barrels, and receivers. The grain follows the part contour, which improves fatigue life compared to billet. The tradeoff is tooling cost and lead time for dies, plus finish-stock allowances that require more machining than a near-net casting.
Investment castings suit complex small parts (trigger guards, small housings) where near-net shape reduces machining. Sand casting and investment casting are both prevalent for ferrous firearm parts. Dimensional accuracy is lower than forging, and porosity must be controlled for structural parts.
Billet (bar or plate stock) offers maximum flexibility for prototyping and low-volume runs. No tooling cost, immediate availability, but high material waste. A 7-pound billet can yield a receiver that weighs only a fraction of that after CNC milling, which drives up both material cost and cycle time.
Stamped blanks work well for sheet-metal components: magazine bodies, trigger guards, dust covers. High throughput, low per-part cost at volume, but limited to parts with relatively simple geometry.
Polymer preforms (injection-molded blanks or net-shape molded parts) apply to stocks, grips, and lower receivers in polymer-frame designs. Glass-filled nylon (PA66-GF30) is the most common structural polymer; glass-filled PPS handles higher-temperature environments near the action.
| Material | Common alloy | Heat treat family | Typical application |
|---|---|---|---|
| Carbon/alloy steel | 4140, 4150 | Quench & temper | Barrels, bolts, carriers |
| Stainless steel | 416R, 17-4 PH | Solution treat & age (17-4); anneal (416R) | Barrels, small parts |
| Aluminum | 7075-T6 | Solution treat & age | Receivers, handguards |
| Tool steel | H13 | Quench & temper | High-wear internal parts |
| Polymer | PA66-GF30, PPS | N/A | Stocks, grips, lower receivers |
CNC machining after forging is often the most cost-effective route for receivers at moderate-to-high volumes, since forged parts benefit from CNC finishing to achieve final tolerances that forging alone cannot hold.
Pro Tip: When choosing forging vs. billet for a receiver, factor in finish-stock allowance. Forgings typically need 0.030"–0.060" of finish stock on critical surfaces, which adds machining time but reduces raw material cost at volume. Billet wins for prototypes and first articles; forgings win at 500+ units per year.
What machining operations does precision firearm production require?
The machining sequence for a receiver is more involved than most non-firearm parts because it combines tight-tolerance bores, complex pocket geometry, and features that carry regulatory significance. Getting the operation order wrong means rework or scrap.
Receiver machining sequence
- Op 10: Establish datum surfaces (face mill, drill datum holes); rough mill exterior profile to within 0.040" of finish.
- Op 20: Index to secondary fixture; rough mill interior pockets and magazine well to within 0.020".
- Op 30: In-process CMM check on datum surfaces and critical pocket dimensions.
- Op 40: Finish mill all exterior surfaces; drill and ream pin holes to ±0.0005".
- Op 50: Finish mill interior pockets; bore rail surfaces to final dimension.
- Op 60: Wire EDM for magazine well final geometry and any sub-thousandth profiles.
- Op 70: Drill and tap all threaded features; deburr.
- Op 80: Final CMM audit before releasing to heat treat.
For smaller parts (pins, sears, bolt faces), the sequence compresses: turn OD → drill/ream ID → mill flats → EDM or grind critical surfaces → deburr → inspect. Springs are typically purchased as semi-finished wire forms and ground to final length and load spec.
Equipment and when to use it
Multi-axis CNC mills and lathes handle the bulk of receiver and barrel work. Five-axis capability lets shops machine complex profiles in fewer setups, which reduces fixturing error accumulation.

Hydromat and rotary transfer machines are the right call for high-volume small parts (pins, detents, small housings) where cycle time per part must be measured in seconds, not minutes. Machining Technologies LLC runs Hydromat systems for exactly this application, producing millions of parts annually across its large facility.
Wire EDM belongs at the end of the sequence, after finish machining, for features where sub-thousandth accuracy matters. Shops report wire EDM cuts to 0.0001" for magazine wells and similar profiles. Using EDM for bulk removal wastes electrode wire and cycle time.
Broaching is the standard method for splines and keyways. It is fast, repeatable, and produces excellent surface finish, but tooling cost is high and geometry is fixed.
Tolerance targets for critical features: headspace surfaces hold ±0.001" or tighter; bore concentricity for barrels targets 0.0005" TIR; pin holes for trigger groups typically hold ±0.0003"–0.0005". Tight-tolerance firearm machining at these levels requires temperature-controlled inspection rooms and calibrated CMMs on a regular verification schedule.
Pro Tip: Reserve wire EDM for final feature generation on pockets and profiles where the geometry cannot be achieved by milling alone. Scheduling EDM after all other machining is complete also means you are not re-fixturing a precision-EDM’d part for subsequent operations that could introduce burrs or distortion.
What heat treatments do firearm components need?
Heat treatment is where metallurgy either validates or undermines everything the machining department did. The wrong cycle, the wrong quench medium, or a missed straightening step can turn a dimensionally perfect part into scrap.
Common heat treatment processes
- Quench and temper (Q&T): Standard for 4140/4150 barrels and bolts. Austenitize, quench in oil or polymer, temper to target hardness. Typical barrel target: 26–32 HRC. Bolt target: 38–42 HRC.
- Case hardening (carburizing/nitriding): Adds a hard surface layer while keeping a tough core. Salt-bath nitriding (Tenifer/Melonite) is common for barrels and bolt carriers; it also improves corrosion resistance.
- Induction hardening: Selective surface hardening for wear surfaces (locking lugs, rail surfaces) without affecting the full part geometry.
- Solution treat and age (STA): Required for 17-4 PH stainless and 7075 aluminum. Aluminum receivers typically arrive in T6 condition from the mill; verify before scheduling additional aging.
- Stress relief: Applied before finish machining on parts with significant residual stress from forging or rough machining. Typical cycle: 1,000°F–1,100°F for 1–2 hours, slow cool.
| Component | Typical alloy | Heat treatment | Target hardness |
|---|---|---|---|
| Barrel | 4150 CMV, 416R SS | Q&T or salt-bath nitride | 26–32 HRC |
| Bolt | — | Carburize + Q&T | — |
| Receiver (steel) | 4140 | Q&T or stress relief | 26–32 HRC |
| Receiver (aluminum) | 7075-T6 | STA (verify incoming condition) | 87 HRB |
| Sear / trigger | 4140, tool steel | Q&T or case harden | 38–42 HRC |
| Spring | Music wire, 17-7 PH | Stress relieve after forming | Per load spec |
Distortion is the primary heat-treat risk for long, slender parts like barrels. The best mitigation is planning finish-machining allowances based on historical quench distortion curves for your specific alloy and section geometry. Fixturing parts during quench, where feasible, reduces bow. An iterative heat-treat/straighten/finish cycle is standard practice for barrels at production scale.
Pro Tip: Leave 0.005"–0.015" of finish-machining stock on bore and OD surfaces after rough machining, specifically to absorb heat-treat distortion. Trying to hold final bore dimensions before heat treat and then straighten afterward is a reliable way to generate scrap.
Which finishing and coating options work best for firearm parts?
Surface finishing is not cosmetic. The right coating protects wear surfaces, prevents corrosion in field conditions, and in some cases adds measurable hardness. The wrong one flakes, traps moisture, or adds enough thickness to affect fit.
Finishing sequence before coating
Every part goes through mechanical deburring first (hand deburring, tumble/vibratory finishing, or automated deburring cells), then media blasting to establish a uniform surface profile for coating adhesion. Passivation applies to stainless parts before any other coating. Polishing is reserved for external surfaces where appearance matters or for bore surfaces where surface finish affects accuracy.
Coating options compared
- Bluing (hot or cold): Traditional iron oxide finish. Low cost, moderate corrosion resistance. Requires clean, oil-free surface. Best for external steel surfaces in dry environments.
- Parkerizing (manganese or zinc phosphate): Better corrosion resistance than bluing, excellent paint/oil adhesion. Standard military finish. Requires post-treatment oil to activate full protection.
- Salt-bath nitrocarburizing (Melonite/Tenifer/QPQ): Diffusion process that adds a hard, corrosion-resistant compound layer. Passes ASTM B117 salt spray at 96+ hours. No dimensional change concerns for most features. Preferred for barrels and bolt carriers.
- Hard-coat anodize (Type III): For aluminum receivers. Adds 0.001"–0.002" per surface, so mating surfaces must account for coating thickness in the tolerance budget.
- Cerakote: Polymer-ceramic coating applied by spray and oven-cure. Excellent corrosion and chemical resistance, wide color range, 0.001" typical thickness. Requires surface prep to 125–250 Ra.
- DLC/PVD: Diamond-like carbon or physical vapor deposition for extreme wear surfaces (bolt faces, locking lugs). High cost, but adds measurable hardness and reduces friction.
Masking is critical for threaded features, headspace surfaces, and any bore that must remain at final dimension. Coat before final assembly when possible; coating after assembly risks contaminating internal surfaces and makes rework expensive.
How are barrels manufactured and rifled?
Barrel production runs on a separate track from receiver machining and has its own sequence of operations, each with distinct accuracy implications.
Barrel workflow: Blank sourcing (typically 4150 CMV or 416R stainless in bar stock) → initial turning to rough OD contour → deep-hole drilling (gun drilling) for bore → reaming to final bore diameter → rifling → stress relief/straightening → chamber reaming → final OD contour and threading → headspace gauging → inspection.
Rifling method comparison
| Method | Accuracy potential | Throughput | Typical application | Cost driver |
|---|---|---|---|---|
| Cut rifling | Highest (single-point) | Very low (minutes per groove pass) | Custom, single-shot, extreme-accuracy rifles | Labor and cycle time |
| Button rifling | High | Moderate | Sporting and precision rifles | Button tooling, bore prep |
| Hammer forging | High (consistent) | Very high | Military, high-volume commercial | Capital cost of hammer forge |
Bore concentricity targets 0.0005" TIR relative to the OD datum. Chamber headspace is gauged 100% with go/no-go gauges before any barrel leaves the machining cell. Wire EDM and honing both appear in barrel production: EDM for chamber geometry refinement in some designs, honing for final bore surface finish and dimensional correction after rifling.
Pro Tip: Match rifling method to your volume and accuracy target. Hammer-forging delivers consistent accuracy at high volume with low per-part cost once the capital is amortized. Cut rifling is the right call for sub-MOA custom work where cycle time is not the constraint. Button rifling sits in the middle and is the most common choice for mid-volume sporting barrels.
How are polymer and non-metal components produced?
Stocks, grips, and polymer-frame lowers follow a different production logic than metal parts. The key decisions are molding vs. machining and how to handle the interfaces with metal hardware.
- Injection molding is the standard route for high-volume polymer parts. Glass-filled nylon (PA66-GF30) is the workhorse material; glass-filled PPS handles higher heat. Tooling (steel injection molds) costs $15,000–$80,000 depending on complexity and cavity count, with lead times of 12–20 weeks for production tooling.
- CNC routing/machining from polymer billet suits prototypes and low-volume runs. No tooling cost, 1–3 week lead time, but higher per-part cost and surface finish differences from molded parts.
- Composite layup (carbon fiber or fiberglass) applies to premium stocks where weight and stiffness matter more than cost.
Dimensional stability is the primary quality concern for molded parts. Glass fill reduces shrink and creep, but wall thickness variation causes warpage. Boss integrity around metal inserts is critical: under-designed bosses crack under torque, and insert molding (placing metal inserts in the mold) is more reliable than post-mold heat-staking for structural fastener locations. All polymer parts that interface with metal components need dimensional checks at the mating surfaces before assembly, not just after.
What does the assembly and functional testing sequence look like?
Assembly is where all the parallel production tracks converge. A disciplined assembly sequence prevents rework and ensures every functional check is performed before a part moves to proof testing.
- Subassembly build: Trigger group assembled and function-checked independently; bolt group assembled and headspace verified with go/no-go gauges.
- Lower/upper receiver mating: Verify pin hole alignment and fit; check for excessive play or binding.
- Barrel installation: Torque barrel nut or extension to spec; verify headspace with field gauge.
- Stock and grip installation: Torque to spec; verify buffer tube or stock attachment integrity.
- Magazine and ejection check: Cycle dummy rounds; verify feed, extraction, and ejection geometry.
- Safety selector check: Verify positive engagement in all positions; confirm trigger cannot release with safety engaged.
- Dry-fire cycle check: Manually cycle action through full stroke; verify reset and re-engagement.
- Final torque audit: Confirm all fasteners are at spec; log on assembly traveler.
Selective fit vs. interchangeable fit is a real production decision. High-volume commercial production targets full interchangeability with tight process capability (Cpk ≥ 1.33 on critical features). Lower-volume precision builds sometimes use selective fit (match-serial pairing of bolt and barrel, for example) to achieve tighter headspace without holding tighter tolerances across the board.
Pro Tip: Build assembly travelers that capture torque values, serial numbers, and inspector sign-offs at each step. When a proof-test failure occurs, the traveler links the failed unit to its specific heat-treat lot, CMM report, and assembly inspector, which cuts root-cause investigation time dramatically.
How do you run quality control and proof testing for firearm components?
QC in firearm production is not a single end-of-line check. It is layered: in-process checks after machining, NDT on critical forgings, and proof testing as the final safety gate. Post-CNC dimensional checks using gauges, CMMs, and hand fixtures are standard before any part moves to heat treat.
Inspection and NDT methods
- CMM (coordinate measuring machine): 100% inspection on critical features for first articles and new tooling qualification; statistical sampling (AQL or Cpk-based) for production runs.
- Optical comparator: Profile verification for complex 2D features; fast and reliable for high-volume small parts.
- Pin gauges and bore gauges: Go/no-go gauging for holes, bores, and pin fits; used at the machine for in-process control.
- Magnaflux (magnetic particle inspection): Detects surface and near-surface cracks in ferromagnetic parts (steel bolts, barrels). Required for safety-critical forgings.
- Dye penetrant inspection (DPI): Detects surface cracks in non-magnetic materials (stainless, aluminum). Lower cost than magnaflux; used on castings and welds.
- Ultrasonic testing (UT): Subsurface flaw detection for thick-section forgings and weld joints.
| Feature | Inspection method | Frequency |
|---|---|---|
| Bore diameter | Bore gauge | 100% |
| Headspace | Go/no-go gauge | 100% |
| Pin hole diameter | Pin gauge | 100% |
| Exterior profile | CMM | First article + AQL sampling |
| Surface cracks (steel) | Magnaflux | 100% on bolts; sampled on receivers |
| Coating thickness | Eddy current / micrometer | Sampled per lot |
Proof testing is the final verification step: a controlled live-fire test with an overloaded proof cartridge in a safe proof chamber. Test records are linked to serial numbers and retained permanently. Recordkeeping must include material certificates, heat-treat lot records, CMM reports, and proof-test results, all traceable to the serialized unit. Consistent quality assurance at this level requires a document control system that can retrieve any record by serial number within minutes.
What ATF regulations apply to firearm component manufacturing?
This is the section most production planners underestimate. The regulatory gate is not at final assembly. It can trigger during machining, depending on what features are being created.
When does ATF consider a part a regulated frame or receiver?
Under the ATF Frame or Receiver Final Rule (2021R-05F), a partially complete frame or receiver is a regulated firearm once it has reached a stage where it can be “readily” completed to house or provide structure for a primary fire control component. The “readily” analysis considers time, ease, expertise, equipment, parts availability, expense, scope, and feasibility.
Critically, ATF Ruling 2015-1 clarifies that performing machining under an entity’s dominion and control can trigger manufacturer licensing obligations. If your engineering or purchasing team provides jigs, templates, or instructions that enable a subcontractor to complete a partially-finished receiver, your organization may carry the principal manufacturer’s licensing obligations.
Legal compliance checklist
- Federal Firearms License (FFL): Any person engaged in manufacturing firearms for sale or distribution must hold a manufacturer’s FFL (Type 07 or Type 10 for destructive devices).
- Serialization timing: Under 27 CFR § 478.92, licensed manufacturers must mark frames and receivers with a serial number and required identifying information within a prescribed timeframe after the item is completed.
- Recordkeeping: Acquisition and disposition records must be maintained permanently (until the licensed activity is discontinued).
- Voluntary classification: ATF accepts voluntary classification requests when you are uncertain whether a specific in-process item has crossed the regulatory threshold.
- Subcontractor controls: Document who performs each operation, what jigs or templates are provided, and at what stage the part is transferred.
Internal compliance gate design
- Map every machining operation that creates a receiver feature (pocket, rail, fire control cavity).
- Separate the manufacturing traveler into “pre-regulated” and “post-regulated” operation blocks with a sign-off at the point of crossing.
- Require engineering review and legal sign-off before releasing drawings for any new receiver design to a subcontractor.
- Retain all documentation (travelers, CMM reports, heat-treat records) linked to each serialized unit.
Pro Tip: Design your manufacturing traveler so that the operation that creates the first regulated receiver feature is explicitly flagged. The traveler should require a supervisor sign-off at that step, capturing who performed the work, on what date, and with what equipment. That record is your evidence of compliance if ATF ever asks.
How do you plan production costs and cycle times for firearm components?
Cost in firearm component production concentrates in a handful of areas. Knowing which drivers dominate for your specific part family lets you make smarter tradeoffs between make/buy, batch size, and capital investment.
Major cost drivers
- Material cost: Billet receivers waste significant material. A 7-pound aluminum billet yielding a sub-2-pound receiver means you are paying for and machining away more than half the input weight.
- Cycle time: Multi-axis CNC time is expensive. Every setup, every tool change, and every re-fixturing adds cost. Hydromat and transfer machines cut per-part cycle time for small parts by an order of magnitude versus individual CNC cells.
- Secondary operations: EDM, heat treat, and specialty coatings are typically outsourced or run in dedicated cells. Each adds lead time and handling cost.
- Tooling and fixturing amortization: Custom fixtures for a new receiver design can cost $5,000–$25,000. That cost amortizes quickly at high volume but dominates at low volume.
- Inspection overhead: 100% CMM inspection on every part is expensive. Moving to AQL sampling once process capability is demonstrated (Cpk ≥ 1.67) reduces inspection cost without sacrificing quality.
| Component | Typical cycle time (production) | Primary cost driver |
|---|---|---|
| Lower receiver (aluminum billet) | Several minutes per part | Material waste + multi-axis CNC time |
| Barrel (4150 CMV) | Tens of minutes per part | Gun drilling + rifling + chamber reaming |
| Bolt carrier group | Minutes per part | Multi-step machining + heat treat |
| Small internal parts (pins, detents) | Seconds per part via Hydromat | Tooling amortization at low volume |
Prototype-to-production timelines: first-article prototypes typically take 8–14 weeks from drawing release. Pilot runs (10–50 units) add 4–8 weeks for fixture qualification and process validation. Full production qualification, including proof testing and regulatory documentation, adds another 4–6 weeks. Batching heat treat and coating operations by lot size (typically 50–200 parts per lot) smooths lead-time variability and reduces per-part processing cost. High-volume manufacturing strategies shift the cost curve significantly once annual quantities exceed a few hundred units.
What safety and environmental controls apply to firearm production shops?
Production managers who treat safety and environmental compliance as a separate department’s problem end up with OSHA citations and EPA disposal costs that dwarf any efficiency gains from the production floor.
PPE and shop controls by operation
- Machining stations: Safety glasses (ANSI Z87.1), hearing protection (85 dB+ environments), cut-resistant gloves for part handling, steel-toed footwear.
- Heat treatment: Face shields, insulated gloves, and fire-resistant clothing for quench bath operations. Quench baths (oil or polymer) carry fire risk; automatic suppression systems and spill containment are required.
- Blasting and coating booths: Full-face respirator (NIOSH-approved, P100 for particulates; organic vapor cartridge for solvent-based coatings), ventilated booths with negative pressure, grounding for static-sensitive coatings.
- Finishing chemicals (bluing, parkerizing, nitride baths): Chemical-resistant gloves and aprons, eyewash stations within 10 seconds of the work area, proper secondary containment for acid and salt baths.
Regulatory compliance
OSHA 29 CFR 1910 (General Industry) governs most shop operations: machine guarding (1910.212), lockout/tagout (1910.147), hazard communication (1910.1200), and respiratory protection (1910.134). EPA regulations under RCRA govern disposal of spent plating solutions, solvent wastes, and nitride bath salts, all of which are typically classified as hazardous waste. Coolant management requires a documented disposal program; many shops use coolant recycling systems to reduce both cost and waste volume. Chip management for aluminum and magnesium alloys carries fire risk; dry chips must be stored in covered metal containers away from ignition sources.
How does Machining Technologies LLC sequence firearm component production?
A representative production run at Machining Technologies LLC illustrates how the process map above translates to actual shop decisions.
For a lower receiver and barrel package, the workflow splits immediately at preform selection. Receivers start from 7075-T6 aluminum billet (no forging tooling required for prototype and moderate-volume runs) and enter a five-axis CNC cell for roughing. Barrels arrive as 4150 CMV bar stock and go directly to gun drilling. Both tracks run in parallel through their respective machining sequences.
The Hydromat system handles all small internal parts (detents, pins, small housings) in high-volume batches, where per-part cycle times drop to seconds. Wire EDM is scheduled after finish milling on receivers, specifically for magazine well geometry and any pocket profiles that require sub-thousandth accuracy. The wire EDM service at Machining Technologies handles these downstream features without requiring re-fixturing on the CNC cell.
Heat treat is coordinated with qualified outside vendors for Q&T and case hardening, with lot traceability maintained through the manufacturing traveler. Machining Technologies’ facility in Webster, Massachusetts spans 70,000 square feet and produces over 20 million parts annually, which means heat-treat batches can be sized to match furnace loads without holding finished parts in queue for weeks.
Vendor qualification checklist
- AS9100 or ISO 9001 certification (or equivalent quality system documentation)
- Material traceability: mill certs required for every lot
- Heat-treat certification: time/temperature records and hardness verification per lot
- Dimensional inspection reports with calibration records for measuring equipment
- Lot control: ability to segregate and identify any lot in the supply chain
- Compliance documentation: FFL status for any vendor handling regulated receivers
Pro Tip: When qualifying a heat-treat subcontractor for regulated parts, require that their process records include the serial number range of parts in each furnace load. That linkage is what makes ATF traceability requirements achievable without a manual reconciliation exercise after the fact.
Key Takeaways
Industrial firearm component production requires a disciplined sequential process, an early ATF compliance gate, and traceability documentation that links every serialized part to its material, machining, heat-treat, and proof-test records.
| Point | Details |
|---|---|
| ATF compliance gate | Identify the exact machining operation that creates a regulated receiver feature and build a sign-off checkpoint there, before that operation runs. |
| Preform selection drives cost | Billet suits prototypes; forgings reduce material cost at volume (500+ units/year) but require die tooling and finish-stock allowances. |
| EDM belongs downstream | Schedule wire EDM after finish machining for sub-thousandth features; using it for bulk removal wastes cycle time and electrode life. |
| QC is layered, not end-of-line | Post-CNC dimensional checks, NDT on critical forgings, and proof testing are three separate gates, each with its own documentation requirement. |
| Machiningtechllc capabilities | Machining Technologies LLC runs Hydromat, multi-axis CNC, and wire EDM under one roof in Webster, MA, with full traceability from raw material to proof-tested component. |
What the production floor actually teaches you
The conventional framing of firearm manufacturing as a linear assembly process misses the most important operational reality: the compliance gate and the machining sequence are not separate problems. They are the same problem.
Every time a shop decides which operation to run next on a receiver blank, that decision has both a dimensional consequence and a regulatory one. The operation that opens the fire control pocket is not just a machining step. It is the moment the part changes legal status. Shops that treat those two facts as belonging to different departments, engineering and legal, consistently end up with either compliance gaps or production delays while the two teams reconcile their timelines.
The smarter approach is to build the regulatory analysis directly into the operation sheet. Not as a footnote, but as a required sign-off field at the specific operation where the threshold is crossed. That forces the conversation to happen before the machine runs, not after the part is already in the coating line.
The other thing production experience teaches is that heat-treat distortion is always underestimated on first articles. Every shop knows it happens. Fewer shops actually build the finish-machining allowance into the original process plan rather than discovering the distortion and scrambling to add a straightening step. Planning for distortion is not pessimism. It is the difference between a process that runs predictably and one that generates scrap on every heat-treat lot.
Machining Technologies LLC: contract firearm component production from prototype to volume
Firearm OEMs and defense contractors who need a single source for precision receiver machining, barrel turning, and high-volume small parts production have a direct path at Machining Technologies LLC. The combination of Hydromat high-volume capability, five-axis CNC milling and turning, and wire EDM precision machining under one roof in Webster, Massachusetts means you are not coordinating three separate vendors for what should be one production flow.

Services relevant to firearm component production include precision CNC milling and turning, Hydromat high-volume small parts production, wire EDM for final-feature geometry, heat-treat coordination with qualified vendors, finishing and assembly support, and full traceability documentation from raw material to proof-tested component. Machining Technologies has been running production since 1985 and produces over 20 million parts annually across aerospace, defense, and firearm applications.
To get a capacity review or submit drawings for quoting, visit the firearm component machining services page or contact the team directly to discuss your production volume, material, and compliance requirements.
Useful sources
- ATF: Definition of “Frame or Receiver” and Identification of Firearms — Primary regulatory source for the frame/receiver classification rules, “readily” definition, and marking requirements under the 2022 final rule. Required reading before any receiver production begins.
- ATF Final Rule 2021R-05F (Federal Register) — Full text of the Frame or Receiver Final Rule, including detailed examples, diagrams, and the regulatory definitions for partially complete frames, multi-piece receivers, and weapon parts kits.
- 27 CFR § 478.92 — Identification of Firearms by Licensed Manufacturers — Governs serialization timing, marking requirements, and multi-piece receiver identification for licensed manufacturers and importers.
- ATF Ruling 2015-1: Manufacturing and Gunsmithing — Clarifies when machining under an entity’s dominion and control triggers manufacturer licensing obligations; critical for subcontracting arrangements.
- ATF: Federal Firearms Licenses — Explains FFL types, application process, and which license applies to manufacturing vs. dealing vs. gunsmithing activities.
- ATF Public Safety Advisory to FFLs and Parts Manufacturers — Practical guidance on how the Frame or Receiver Final Rule applies to distributors, parts kits, and marketing materials; includes the “readily” factor analysis.
- NIJ: Firearms Examiner Training — Materials and Methods — NIJ-hosted examiner training covering manufacturing methods including sand casting, investment casting, and common ferrous alloy processes; authoritative background for materials selection.
- Interesting Engineering: How Guns Are Made in a Factory — Video overview documenting the factory production sequence from machining through case hardening, assembly, and proof testing; useful for process-flow orientation.
Recommended
- Master Precision Machining Workflow for Firearms Components | Machining Technologies
- Prototype Firearm Parts: A Guide for Engineers | Machining Technologies
- Firearm parts machining: ±0.001" tolerance ensures reliability | Machining Technologies
- Firearm parts machining: methods, materials & quality | Machining Technologies