

TL;DR:
- Optimizing high-precision prototyping reduces costs and cycle times critical to aerospace and defense projects.
- Early collaboration with suppliers, material substitution, and modular fixturing drive faster, more affordable iterations.
- Focusing on multiple, iterative prototypes rather than just the first enhances learning and accelerates program success.
High-precision part prototyping is where aerospace and defense programs either gain ground or bleed budget. When a single iteration cycle takes weeks and costs thousands, the entire development timeline compresses in the wrong direction. Learning how to optimize part prototyping is not a nice-to-have for OEMs and industrial manufacturers. It is the difference between a program that delivers on schedule and one that burns through contingency before the first production order ships. This guide walks through the specific methods, decisions, and habits that turn prototyping from a cost sink into a competitive advantage.
Table of Contents
- Understanding the prototyping problem: Challenges in part prototyping
- Preparing for efficient prototyping: Prerequisites and planning essentials
- Executing optimized prototyping: Strategies to cut time and cost
- Avoiding pitfalls and verifying prototype success
- Why optimizing for multiple iterations is the true key to prototyping success
- How Machining Technologies streamlines your precision prototyping process
- Frequently asked questions
Understanding the prototyping problem: Challenges in part prototyping
Before you can fix the process, you need to name what is actually breaking it. Most OEMs know prototyping is expensive. Fewer have pinpointed exactly where the waste accumulates.
Prototyping basics tell you that the goal is to learn fast and fail cheap. The reality for manufacturers of critical parts is more complicated. Tight tolerances, exotic materials, and approval workflows all slow iteration down. As rapid prototyping experts note, rapid prototyping stops being rapid when outsourced parts take weeks and iteration costs accumulate without a structured process to contain them.
Here are the core pain points that tend to undermine prototyping efficiency:
- Long lead times from traditional outsourcing. Sending prototype drawings to a vendor with a 3-to-6-week queue kills iteration velocity before it starts.
- Material mismatches between prototype and production. A plastic prototype tells you almost nothing about how a titanium flight component will behave under thermal and mechanical load.
- Tolerance over-specification. Engineers often apply production-level tolerances to early-stage prototypes out of habit, which drives up machining time and cost with no functional benefit.
- No iteration tracking. Teams repeat the same design errors across cycles because nobody documented what failed and why.
- Supply chain and workflow gaps. Disjointed handoffs between design, engineering, and machining add days of latency that compound across multiple iterations.
Each of these problems has a concrete fix. The sections below address them in sequence.
Preparing for efficient prototyping: Prerequisites and planning essentials
Having outlined the challenges, the next step is setting up the conditions that make optimization possible. Execution without preparation just speeds up the wrong things.
Choose your method based on production intent, not convenience. A photopolymer resin model is fast, but if your production part is a 7075 aluminum housing for a defense application, you need at least one iteration in a machinability-matched metal before design freeze. Choosing CNC materials correctly at the prototype stage saves significant rework later when production materials behave differently under load or finish operations.
Engage your machining supplier before you finalize the design. This is one of the highest-leverage moves available to any OEM. Involving supplier engineering teams upfront identifies manufacturability issues before design freeze, saving expensive redesign loops and shortening development time. A feature that looks clean on a CAD screen may require a special tool, an extra setup, or a tolerance that only one machine in your supplier’s shop can hold.
Apply Design for Manufacturability (DFM) principles early. DFM means designing parts so they are easy and cost-effective to machine, not just functionally correct. Examples include avoiding internal sharp corners that require small-diameter end mills with slow feed rates, keeping wall thicknesses uniform to prevent distortion during machining, and specifying surface finishes only where they actually matter functionally. Precision manufacturing strategies that embed DFM from the first design review consistently outperform those that apply it as an afterthought.

Pro Tip: Ask your machining supplier to run a DFM review on your CAD file before you cut any material. A one-hour review session can eliminate two or three iteration cycles.
| Preparation step | Impact on lead time | Impact on cost |
|---|---|---|
| Early supplier DFM review | Reduces iterations by 2-3 cycles | Saves 20-30% on redesign labor |
| Material selection aligned to production | Eliminates functional mismatch surprises | Reduces late-stage rework costs |
| Tolerance rationalization | Cuts machining time per part | Lowers per-unit prototype cost |
| Modular fixturing planning | Reduces setup time between runs | Decreases per-run setup cost by 30-50% |
The manufacturing prototyping guide covers additional groundwork for setting up an efficient workflow from the first design iteration.
Executing optimized prototyping: Strategies to cut time and cost
With preparations in place, executing proven methods is where the time and cost savings actually materialize. These are not theoretical approaches. They are the specific techniques that reduce cycle time and cost at the shop floor level.
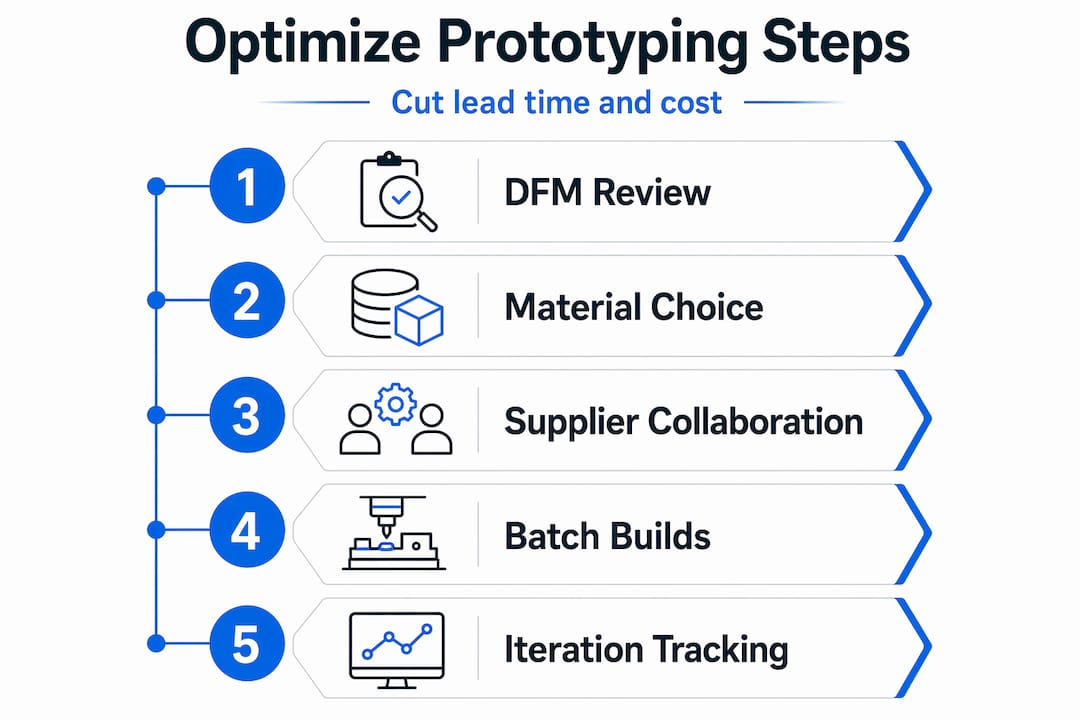
1. Use modular fixturing systems.
Modular fixtures use standardized base plates and clamp components that reconfigure for different parts without custom tooling. For a program running 5 to 10 design iterations, this eliminates the cost of building a new fixture for every change. Setup time drops from hours to minutes.
2. Substitute machinability-matched materials for early iterations.
Low-volume CNC production using aluminum instead of titanium cuts cycle times by 4x and costs by up to 80%, enabling more design iterations within the same budget. You validate geometry, clearances, and assembly fit with aluminum, then confirm material-specific behavior with a single titanium prototype at the functional test phase.
3. Adjust 3D printing parameters for speed without sacrificing enough quality to matter.
For SLA-printed concept models, adjusting layer height from 50 to 100 microns reduces printing time by 50% with barely noticeable quality difference. This is meaningful when you are producing multiple appearance or fit-check models in parallel.
4. Batch build prototypes in groups.
Running 3 to 5 variants in a single machine setup spreads fixturing and programming time across multiple units. Per-unit labor drops significantly, and you gain comparison data from simultaneous testing rather than sequential.
5. Use CNC low-volume production instead of one-off machining.
Precision strategies for critical applications favor CNC low-volume runs over one-off prototyping because programming amortization and setup costs spread across several parts, and design changes between runs are quick to implement when the fixturing is already modular.
Here is a straightforward comparison of approaches for an aerospace bracket prototype:
| Method | Typical lead time | Relative cost per iteration | Best use case |
|---|---|---|---|
| Traditional one-off outsourcing | 3-6 weeks | High | Final validation only |
| CNC low-volume with aluminum | 3-7 days | Low-medium | Geometry and fit iterations |
| Modular CNC with material substitution | 2-5 days | Low | Rapid mid-program iterations |
| SLA at 100-micron layers | 1-2 days | Very low | Concept and appearance checks |
Pro Tip: Do not use production-spec materials until you are at the functional testing phase. Reserve titanium, Inconel, or other expensive alloys for prototypes validating material-specific behavior only. Use aluminum for everything before that point.
When you combine modular fixturing, material substitution, and batch building, the compounded effect on prototyping methods reduces total iteration cost by a significant margin across a full development program.
Avoiding pitfalls and verifying prototype success
After executing optimized methods, verifying results and avoiding common mistakes is what separates teams that improve continuously from those that hit the same walls on every program.
The most common mistake: over-engineering early iterations. Applying tight tolerances and premium finishes to a first-article prototype wastes machining time on a part that is almost certainly going to change. Reserve production-level precision for prototypes that have cleared geometry and fit validation.
Test with production-equivalent materials at the right phase. Industrial prototyping that reduces development costs by up to 30% and accelerates time-to-market does so precisely because it identifies material and process issues early, before tooling and production commitments are made.
Best practices for effective prototype verification include:
- Define quantifiable success metrics upfront. Not “the part looks right” but “dimensional variation within 0.003 inches, surface finish Ra 32 or better, assembly clearance 0.010 to 0.015 inches.”
- Test with real end users or production operators at the functional prototype phase, not just with design engineers.
- Document every iteration result. What changed, what improved, what failed, and what you would do differently. This single habit eliminates the most expensive form of waste: repeating the same mistake on the next program.
- Maintain your equipment. Worn tooling and uncalibrated machines introduce variation that looks like design problems and sends teams down the wrong iteration path.
The prototype’s job is not to be perfect. Its job is to teach you something specific. Define what you need to learn from each iteration, machine to that purpose, and stop there.
Precision parts manufacturing built on documented iteration learnings consistently delivers better outcomes than programs chasing perfection on the first article. Treat every prototype as a structured experiment, and your prototyping optimization work compounds across the program.
Why optimizing for multiple iterations is the true key to prototyping success
Here is the opinion that most prototyping guides will not give you: the problem is not your first prototype. It is your third.
Most OEMs invest their optimization energy in cutting the cost and time of initial prototype one. That is the wrong target. By the time you are three iterations in, your budget is already half gone, your schedule has slipped, and your team is problem-solving in reactive mode. The programs that succeed in aerospace and defense are not the ones that got the first prototype right. They are the ones that could afford to reach the fifth iteration.
Optimizing for the fifth prototype using modular fixturing and material substitution is what slashes iteration cycles by 40%, not optimizing for the first. That reframe changes every decision you make. You stop gold-plating early iterations and start building the infrastructure for rapid, inexpensive cycling.
Modular workholding systems are the clearest example. The upfront investment in a modular fixture system feels harder to justify than a one-off fixture for the first prototype. But by iteration three, that modular system has already paid for itself in setup savings, and it will keep paying through production. The economics only make sense when you account for all five iterations from the start.
Material substitution follows the same logic. Using aluminum for the first four iterations and titanium for the fifth is not cutting corners. It is a deliberate strategy that lets you validate 95% of geometry and assembly behavior at a fraction of the cost, then confirm material-specific performance where it actually matters. Programs that insist on production materials from iteration one routinely run out of budget before they reach a validated design.
Document every iteration with specificity. What changed in the design, what the measured outcome was, and what the next hypothesis is. This is not bureaucratic overhead. It is the difference between a program that learns and one that circles. Iterative prototyping insights from experienced contract machiners consistently confirm that documented iteration loops cut total program time more than any single technical optimization.
The mindset shift is simple but powerful: you are not building a prototype, you are building a learning system. Optimize the system.
How Machining Technologies streamlines your precision prototyping process
The strategies in this guide are only as effective as the machining partner executing them. At Machining Technologies LLC, we have been delivering high-precision contract machining for aerospace, defense, and critical industrial applications since 1985, out of a 70,000-square-foot facility in Webster, Massachusetts.
We bring collaborative DFM review, modular fixturing capability, and deep expertise in precision parts manufacturing to every prototype engagement. Our team works directly with your engineering staff before design freeze to identify manufacturability issues, rationalize tolerances, and select the right CNC machining materials for each iteration phase. Whether you need a small batch of aluminum proof-of-concept parts this week or a validated titanium prototype next month, we give you the turnaround and precision your program requires, without the delays that kill iteration velocity.
Frequently asked questions
What is the best way to reduce prototyping cycle times without losing quality?
Adjusting SLA layer height to 100 microns cuts printing time by 50% with minimal quality loss, and substituting aluminum for titanium in CNC reduces cycle times by up to 4x, giving you more iterations within the same timeline.
Why should I consider material substitution for early prototype iterations?
Machinability-matched substitutes like 7075 aluminum for titanium validate up to 95% of your geometry at a fraction of the cost, reserving expensive production materials for functional testing phases only.
How important is collaboration with machining suppliers during design?
Involving supplier engineering teams before design freeze identifies manufacturability issues that would otherwise cost redesign cycles and weeks of lost schedule, making early collaboration one of the highest-return actions in any prototyping program.
What prototyping phases should I plan for effective testing?
Plan distinct phases from proof-of-concept through appearance, functional, and pre-production validation so that development costs stay 30% lower and issues surface progressively rather than at a stage where changes are prohibitively expensive.
When should I transition from prototyping to small batch production?
Transition when your prototype clears functional and manufacturability criteria and user feedback is consistent. Small production runs of 10-20 units leverage batch building efficiencies to reduce per-unit costs and give you a reliable baseline before full-scale commitment.
Recommended
- OEM contract machining: Streamline precision for high-volume production | Machining Technologies
- Complex part manufacturing: precision strategies 2026 | Machining Technologies
- What is prototyping in manufacturing: a guide | Machining Technologies
- Subcontract Machining: Boost OEM Precision & Efficiency | Machining Technologies